Things change and nothing can be more accurate when discussing the difference in functionality between an oxy-fuel cutter and a plasma cutter. There was a time when oxy-fuel cutting was king and reigned supreme over all other types of metal cutting like grinding discs.
But just like everyone else, you won’t want to go back to any other types of metal cutting after using a plasma cutter.
Plasma cutters are the perfect tools to have in a metal workshop; they are much simpler and cheaper to use than oxy-fuel cutters.
So what is plasma cutting and what does it entail? Let’s find out
What Is The Working Process Behind Plasma Cutting?
To understand plasma cutting, we first have to define what a “plasma” is. Plasma is essentially the fourth state of matter along with solid, liquid, and gas.
Through the introduction of energy e.g. heat, matter changes from one state to another. For example, a certain amount of heat changes water from a solid to a liquid form. Finally, an increase in the heat level makes the gas ionized. At the ionized state, what we have becomes electrically conductive – this is what is then called ‘plasma’.
Therefore, a plasma cutter uses this electrically conductive gas (plasma) to transfer energy from a power supply to any conductive material. This results in a faster, cleaner, and more efficient cutting process than you can get with oxy-fuel cutting.
The plasma arc formation commences when a gas like nitrogen, oxygen, or argon is “forced” through a small-sized nozzle orifice inside of the torch. After this, an electric arc generated from the external power supply is then introduced to this gas flow of high pressure, this results in what is usually described as a “plasma jet”.
The plasma jet reaches a temperature of about 40,000°F, to provide an instant piercing power for cutting through the workpiece.
The Components Of A Plasma Cutter Include:
• Arc Starting Console:
The arc starting console generates about 5,000 VAC at 2 Mhz. This current produces a spark inside the plasma torch, thereby creating the plasma arc.
• Plasma Torch:
The plasma torch houses the consumables in an alignment. The consumables are the parts that allow the plasma arc to be generated in the plasma torch. These parts include the nozzle (the part that lets out the air), swirl rings, electrodes, and the likes. This device generates and directs the flow of plasma.
• Power Supply:
This is the power source of a plasma cutter. A plasma cutter is both AC and DC voltage based. The plasma cutter power supply converts AC voltage into 200-400 VDC of DC voltage. The power supply component of the plasma cutter supplies the required energy that maintains the plasma arc after ionization.
How To Set Up A Plasma Cutter
Below Are The Six Steps Involved:
Step 1: Start by connecting the plasma cutter to the appropriate air compressor.
Step 2: Next, the plasma cutter should be connected to either a 240V or 415V power source (depending on which is suitable for your machine requirement)
Step 3: Plug the ground lead or earth lead into your plasma cutter.
Step 4: Fix the plasma torch into your plasma cutter.
Step 5: Select the appropriate cutting amperage on your plasma cutter. This should depend on the thickness of the material (use higher amperage for thicker materials)
Step 6: Press the switch on your torch handle to create the plasma arc. Move the torch handle over the material to cut it with the plasma arc.
Start cutting by either piercing a hole on the material or from the edge of the material you are working on.
Some people like to work from the whole to the part, while others prefer from the part to the whole, it all depends on your preferences. Cutting perfect circles and other unique shapes have been made much easier with the help of a circle cutting kit and working template.
A plasma cutter is considerably portable and easy to handle around your workspace since you don’t need heavy gas bottles to use it. Plasma cutters make small cut widths that minimize the heat-affected zone on the material. This is another advantage it has over oxy-fuel cutting.
Read More: How To Properly Set Up And Use a Plasma Cutter
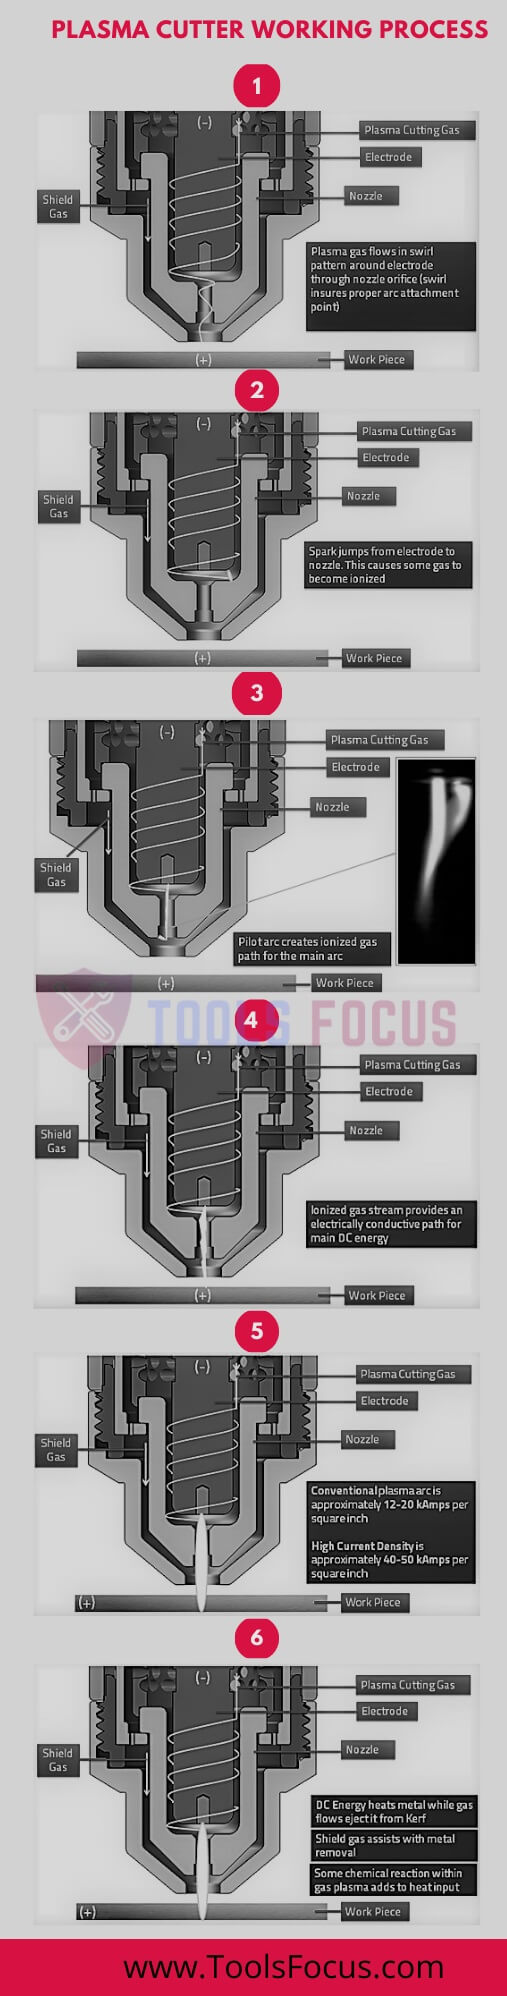
Infographic: Plasma Cutter Working Process
Is There A Difference Between A Clean-Cut And Severance Cut?
A clean-cut is achieved when the machine cuts through the material and the parts cut out fall ways from each other. This leaves minimal rubbish on the bottom edge which can be quickly pulled off using pliers. The cutting marks will begin straight and then make a slope with a small angle towards the bottom of the cut. After this, the metal shouldn’t require any extra work before welding them together.
On the other hand, a severance cut is achieved when the machine’s user utilizes it at close to the maximum thickness capability. This cutting speed becomes much slower in comparison to a clean cut with the metal needing some cleaning up towards the bottom edge.
The difference between these two types of cut is apparent in their descriptions. The clean-cut is used for smaller metal works while the severance cut is used for larger jobs. None is better than the other as both methods serve specific purposes depending on the thickness of the working material. Essentially, the clean-cut is the most desirable as it is less messy and good to go from the jump.
Plasma Torch Consumables
As previously pointed out, the plasma torch head consists of 3 main consumables (parts) that require the most replacing; electrode, cutting tip, and stand-off spring. Other parts include the outer retaining nozzle and swirl ring (gas distributor). Here are their respective functions;
• Electrode:
The electrode is the part that screws directly into the head of the plasma torch.
• Cutting Tip:
There are several available hole sizes available, the size of the amperage bandwidth of the cutting arc all plays a role in your preferred size. These sizes include; 1.1mm for up to 60A, 1.3mm for 80 A, and 1.5mm for 100A
• Stand Offspring:
Also known as the “pointed spacer”, the stand-off spring fits into the end of the outer nozzle keeping a distance of 1-2mm between the workpiece and the tip. However, it may be removed if you wish to use a template or straight edge cutting shapes.
• Outer Nozzle:
It screws onto the head and holds a large electrode in place.
• Gas Distributor:
Also called the swirl ring, the gas distributor fits between the tip and electrode and is usually manufactured with a non-conductive material.
The Step-By-Step Process Of Using A Plasma Cutter
Getting started with a plasma cutter can be a little bit scary and overbearing. The concern isn’t just the technicalities involved when you use the machine.
Your safety as a user is also a significant concern. But by following the step-by-step process, you will find out the safest way to make your job more efficient and prolong the lifespan of your equipment.
You will also be able to use your plasma cutter properly for the sake of your safety.
These steps are;
Step 1: Make Sure The Area Is Clean And You’re Working Safely
Before you set up the plasma cutter and begin your cutting process, please ensure that your preferred working environment is as clean as can be. It would be best if you kept your work environment dust and debris free to prevent particles from getting into the cooling fan of your machine. These particles can result in severe damages to your machine. Also, ensure to wear the appropriate plasma cutting gear before commencing your work i.e. helmet, boots, apparel, goggles, gloves, respiratory mask, and earplugs. This will significantly reduce the risk of a work injury.
Step 2. Set Up A Stable Work Surface
Your working surface needs to be made as accident-proof as possible as this is where all the deeds get done during the cutting process. Working with a plasma cutter just like any other tool is risky if placed on an unstable work surface. Make sure that the setup is strong and sturdy enough for you to cut on. You can use a metal clamp to hold the piece while cutting to make the cutting process more secure.
Step 3: Plug In Your Plasma Cutter
Ensure that you have put on your gloves and rubber boots before handling the device. Also, make sure that the device is powered off before you plug it in to avoid electrocution (although this is highly unlikely, it is always best practice to be on the safe side).
Step 4: Connect The Air Compressor
If the plasma cutter you have does not come with a built-in air compressor, you will have to connect the external air compressor to the unit. Without doing this, your cutter will not function as plasma requires compressed air to work properly.
Step 5: Switch On The Air Compressor
After you have attached the air compressor to your cutting unit and ensured it is sealed tight, turn on the air compressor.
Step 6: Connect The Ground Clamp
The ground clamp is a component of the plasma cutter that is vital to protecting both the user and the plasma cutter itself. Plasma cutting involves using an electrical charge to melt metal. Attaching the ground clamp to where you need to cut helps prevent electrocution.
Step 7: Turn The Machine On
Once you have connected everything as stated above, turn on the machine switch.
Step 8: Setup The Amperage
The amperage you set on the cutter depends on the thickness of the material you want to cut.
The thicker the material, the higher the amperage will have to be.
Step 9: Cut The Metal
Ensure to keep the nozzle end on the edge of the base metal and then push the trigger to begin the arc. For the best result, it is advisable to move the torch slowly over the metal and if you have any plasma templates, you may use the guidelines surrounding the nozzle.
Step 10: Turn Off The Machine
As soon as you are done cutting your metal, ensure to turn off the unit as it may lead to a fire or injury hazard if left on.
Step 11: Disconnect The Ground Clamp
Disconnect and disassemble the unit, including the G-Clamp from your cutting base when you finish cutting.
Step 12: Turn Off The Air
Rotate the lever 90 degrees vertically to turn off the air.
Step 13: Allow The Torch To Cool Down And Wind Up All The Hoses
Once you are done with your cutting job, leave the torch to cool off. When you release the trigger, the machine lets out ‘post-flow air’ which lasts for like 30 seconds, give or take. Wind up all the hoses and wrap up the torch, ground line, and airline.
The Risks Associated With Plasma Cutting
If you follow all the safety precautions laid out for you in the manufacturer’s manual, you should be on the safe side.
But it is also essential to know the potential dangers associated with plasma cutting, they include;
• Arc:
The arc is achieved through the combination of invisible ultraviolet and infrared light rays. The arc produced is extremely hot and powerful, making it dangerous to unprotected body parts like the eyes and arms, and others.
• Sparks And Heat:
The heat and sparks produced by a plasma cutter during the cutting process are potentially hazardous for anything near the welding and cutting area. Avoid any form of contact with the spark while working as it can lead to serious injuries. The spark, radiation, and intense light produced during the cutting process are harmful to the eyes.
• Electrocution:
As previously pointed out, a plasma cutter is a potential electrocution hazard. Ensure to wear your protective gear and do not work in a moist environment as this dramatically increases the risk of electrocution.
• Fumes And Gases:
During cutting, fumes and gases are produced. It gets worse when you are working with coated metals as they tend to emit more toxic fumes. The fumes are dangerous to your health and every other person around the working area. Thus the need for everyone to wear a protective mask once close to the work area.
Frequently Asked Questions
Is An Air Compressor Needed For All Plasma Cutters?
Yes. The basic principle behind the plasma cutting technology is based on the air pressure generated by the air compressor. Thus, if there isn’t an air compressor present, the unit can’t function because, as explained at the beginning of this post, plasma results from heating air at a high temperature. Without air, your plasma cutter won’t produce plasma.
What Air Pressure Is Required For Plasma Cutting?
A suitable air compressor has to be selected to supply the correct quantity of AIT to flow to your plasma cutter. If you use the wrong air pressure, it may result in the air compressor running out all the time and your unit will cut inconsistently.
How Much Do I Need To Spend On A Plasma Cutter?
Plasma cutters can definitely boost your productivity level, but many of these units are pretty expensive.
However, you can still get a top-quality plasma cutter for $475 to $800. Although this does not represent the best quality plasma cutter, you would need to pay more for a plasma cutter.
If you are new to metal works, you should go for a versatile and durable machine instead of heavy-duty machines. This way, you would get a plasma cutter that can serve your needs while spending within your budget.
Plasma Arc Starting Differences
There are two plasma arc starting differences namely the HF contact start and the HF pilot arc start.
For the HF contact Start, a high-frequency is created within the machine and moves between the cutting tip and the workpiece providing a near-automatic cutting.
On the other hand, the HF pilot arc also uses the high-frequency generated within the unit when the trigger is pressed. A pilot arc flame comes from the cutting tip and it is about 1m long. It is excellent for corroded or deeply painted surfaces as the unit senses the workpiece and starts the main cutting amperage.
What Is Gouging When Using A Plasma Cutter?
Plasma gouging is for when the user intends to remove a defective or old weld in metal. Gouging is suited to machines with HF pilot arc starting. To do this, you will need to use a special gouging tool that has a larger hole than the standard cutting tip.
A lot of plasma cutters we have now can gouge as well as cut, so nothing is stopping you from gouging with your plasma cutter.
How Hot Does A Plasma Cutter Actually Get?
A plasma cutter uses DC voltage to heat compressed air to an extremely high temperature where the atoms are ionized to create a ‘plasma arc’. The temperature of a plasma cutter jet can rise to 40,000° F (22,000° C), hot enough to melt metal in seconds. This is what makes it such an effective method of cutting metal of any thickness.
What Kind Of Gas Should You Use With A Plasma Cutter?
There are four recommended gases for users of plasma cutters, namely, compressed air, argon, oxygen, and nitrogen. Compressed air is a highly versatile plasma gas that produces top-quality cuts on stainless, mild steel, and aluminum. Oxygen is famous for cutting through mild steel because of the clean and fast cutting speeds that it helps provide. Nitrogen is usually used for high current plasma machines and cutting metals of up to 3 inches thickness, including mild and stainless steel or aluminum.
What Shade Is Needed For Plasma Cutting
It is dangerous to look directly at the plasma arc as it can cause severe damage to the eyes, resulting in total blindness. So we can recommend that you get suitable plasma cutting glasses and goggles for optimum protection.
Here are some simple tips for choosing the suitable plasma cutting shade for you:
(1) The welding helmet, glass, or goggles you decide to get must meet the industry standards. That means that it must have gone through a series of tests to prove that it is 100% safe for use.
(2) The shade you choose should be the perfect fit for your machine’s amperes. There are different ampere capabilities for different plasma cutting machines. You should check the guide for a shade number that matches the amperes of your plasma cutting machine.
According to the American National Standard Institute, the recommended shades to wear while using a plasma cutter are given in the table below.
|
Arc Current (Amperes) |
Minimum Protective Shade | Suggested Shade Number (Comfort) |
|
Below 20 |
4 |
4 |
|
20-40 |
5 |
5 |
|
40-60 |
6 |
6 |
|
60-80 |
8 |
8 |
|
80-300 |
8 |
9 |
|
300-400 |
9 |
12 |
| 400-800 | 10 |
14 |
Do You Touch The Metal With A Plasma Cutter?
Not exactly. If you see the plasma flame as part of the plasma cutter unit, you do touch the metal with a plasma cutter. If not, your device should be placed just close enough for the plasma flame to reach the metal object as that is the cutting appendage of the plasma cutter. Letting any other part of the device touch the metal while cutting might damage your machine or even cause injury for you.
Can You Weld With A Plasma Cutter?
No. That is the difference between a plasma cutter and a multiprocess machine. The plasma cutter functions as a cutter only (and it performs this function superbly). The multi-process machine boasts several other functions like Stick and TIG welding. So, you should consider buying a separate machine for welding if you plan to do any welding work.
Conclusion
Plasma cutters are easy to use and also very convenient as they are designed to be carried around the workshop. Getting one will greatly improve your productivity and lower your cutting costs.
The tool doesn’t require any preheating (which is a great timesaver).
It cuts any metal as long as it is an electric conductor. And it can be easily handled and carried around your work site.
So if you are looking to upgrade on your oxy-fuel cutter, a plasma cutter should be your go-to option, especially if you deal with all sorts of thick materials.
Leave a Reply